MeraForum Community.No 1 Pakistani Forum Community

| Adobe photoshop !! Adobe photo shop lectures !! |
| Advertisement |

 |
|
|
Thread Tools | Display Modes |
|
(#1)


|
|
||||
|
They say that sequels are never as good as the original - try telling that to Adobe. There fully revamped Photomerge now comes in three flavors and is 'fully fantastic'. You get to explore the greatly improved Photomerge features only in Elements 6 and Photoshop CS3. Photomerge is now capable of aligning and blending images without any signs of struggle - banding in smooth areas of tone. The fully revised Photomerge feature first made its appearance with CS3 but the maths seems to have got even better with the release of Elements 6 and the stitching is so clever it will really have you amazed at the quality that can be achieved inside this budget program. 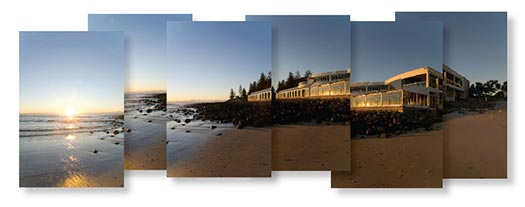 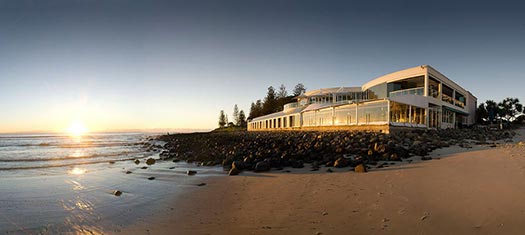 The quality will be even better if you capture the component images of your panorama in vertical format (to reduce the effects of converging verticals) with a 50% overlap and you also use a manual exposure, focus and white balance setting on your camera (or process the images identically in camera Raw). The results will now truly be seamless - an excellent way of widening your horizons or turning your humble compact into a 30-megapixel blockbuster. 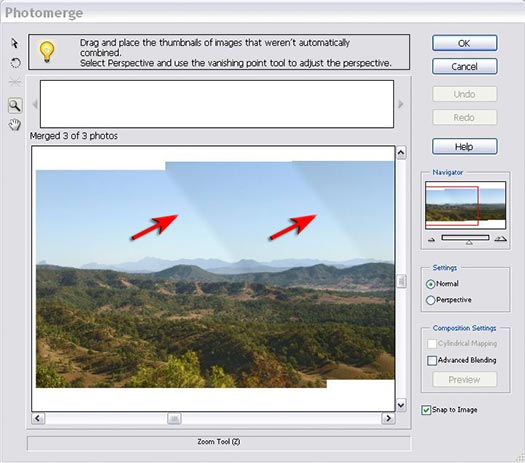 The Photomerge feature in previous versions of Photoshop Elements (and the full version for that matter) left a lot to be desired. All of the flaws and weaknesses of the original feature are now gone with the release of Elements 6.0. 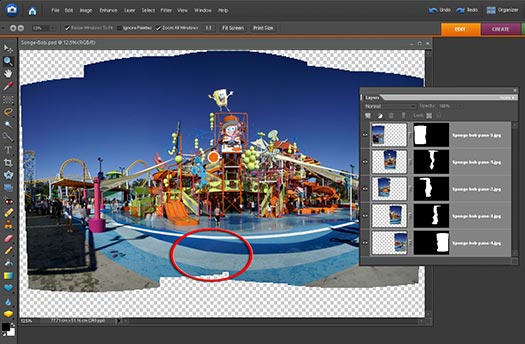 Now the only limitation you may run up against is Photoshop's ability to align and blend strong geometric lines that come close to the camera lens. If the camera is hand-held to capture the component images (you have not used a specialized tripod head designed for professional panoramic stitching work) then the problem of aligning both foreground and distant subject matter is a big problem for any software (Photoshop handles it better than the rest). The camera should ideally be rotated around the nodal point of the lens to avoid something called parallax error. You will probably not encounter any problems with the new Photomerge feature unless you are working with strong lines in the immediate foreground. Notice how the curved lines in the image above are slightly crooked due to the fact that these images were shot with a 18mm focal length lens and the lines are very close to the lens. Still pretty good - but not perfect. 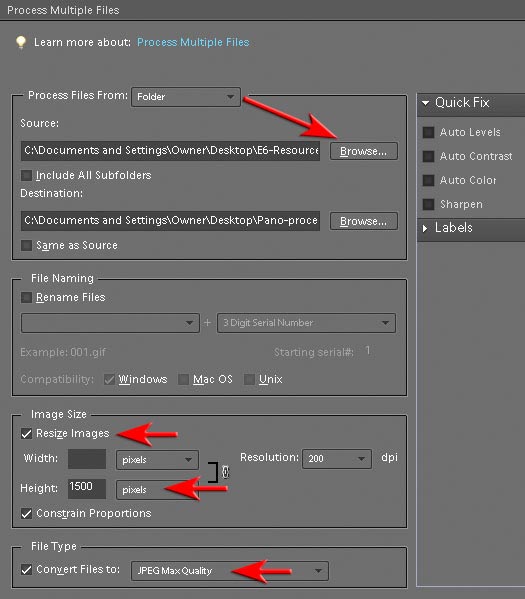 STEP 1 It is strongly recommended when using an older computer, or a computer with less than 1 GB of RAM, to downsize very large images - unless of course you want to wallpaper your room with the end result and are prepared to wait whilst Photoshop Elements creates a massive image. Go to 'File > Process Multiple Files'. Select the 'Source' folder of images (hit the Browse button) and then select a destination folder of where you would like your processed files to be saved. Check 'Resize Images' and select a more reasonable size. Check 'Convert Files to:' and choose the JPEG Max Quality option. Select OK to process the images. 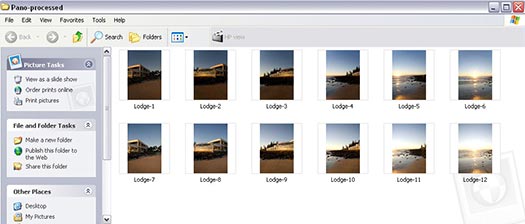  STEP 2 Select all of the images from the destination folder you created in the process Multiple Files dialog box. Open the processed images in the Edit space of Photoshop Elements. From the File > New menu choose Photomerge Panorama. Note In this project I have used a total of twelve images using two different exposure setting. The camera was first set to a manual mode and an exposure was selected that was perfect for the rising sun in this scene (the brighter side of the panorama). Six images were then captured even though the exposure was not perfect for the right side of the panorama - away from the sunrise (the images are a little dark). A second set of six images was then created with an exposure that was optimized for the right side of the panorama (the dark side) but this has led to overexposure in the last two frames that point towards the sun. 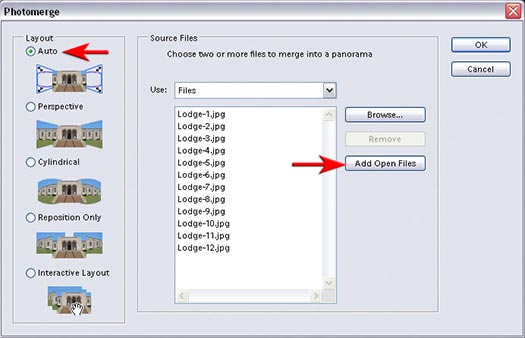 STEP 3 In the Photomerge dialog box click on the Add Open Files button and select the 'Auto' radio button in the Layout options. Select OK and let Photoshop do all of the work - and what a lot of work it has to do aligning and blending all of these images and even juggling which is the best exposure to use for any given location. 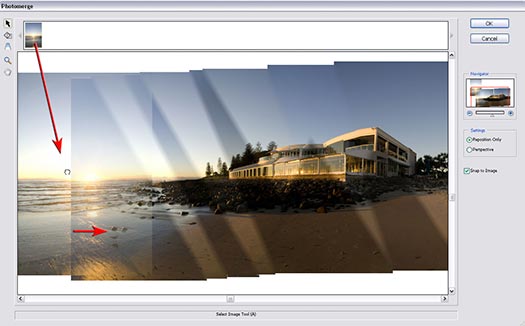


|
| Sponsored Links |
|
|
|
(#2)
|
|
||||
|
Performance Tip The 'Auto' layout setting gets it right most of the time. Occasionally you may need to select either the 'Perspective' or 'Cylindrical' options for very wide panoramas. The Interactive Layout can be selected when Elements is having trouble deciding where one or two of the component images should be placed. This can occur when there is little detail in the image to align, e.g. a panorama of a beach scene where the only obvious line in the image is the horizon line. When this occurs you will need to drag the problem file into the best location in the Interactive Layout dialog box. 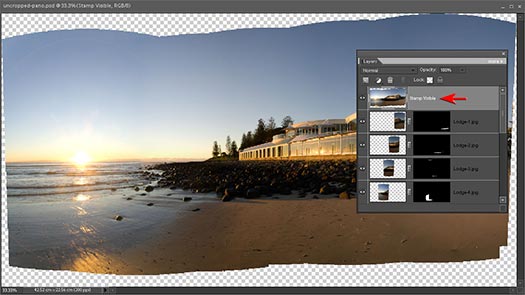 STEP 4 In previous articles I have written on this subject I would have been rattling on for another six steps outlining manual techniques to circumnavigate the shortcomings of Photomerge - but as you can see from the results in this project we just about have perfection handed to us on a plate. Fantabulous (I know that's not in the dictionary but neither is Photomerge - yet)! If you use full resolution images you will probably have to go and make a cup of coffee while Photoshop Elements puts your panorama together (120 Megapixels in this project). 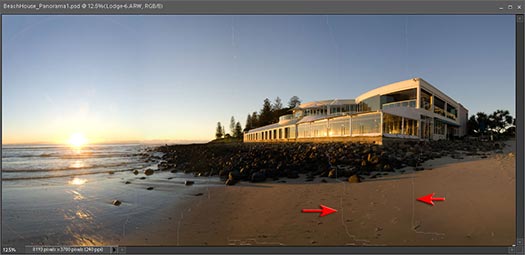 If you downsize before you flatten your file you will probably encounter hairline cracks appearing in your image after reducing the image size. The solution to this problem is to either flatten the file or stamp the visible content to a new layer (Ctrl + Shift + Alt and then type the letter E) before you reduce the size of the image. 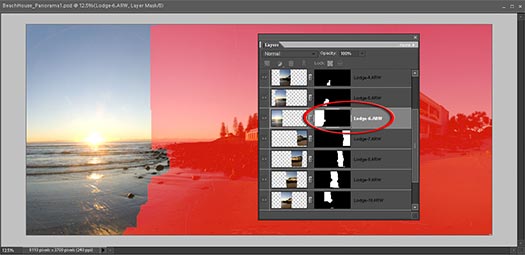 STEP 5 This is not really a step more of an observation (you can see I am struggling to find things for you to do so you feel you have earned your medal on this project), if you hold down the Alt key and click on each layer mask in turn you will notice that Elements has done a great job of working out the optimum exposure for each part of this panorama. Photomerge in Elements does an even better job than Photomerge in CS3 on this particular project. 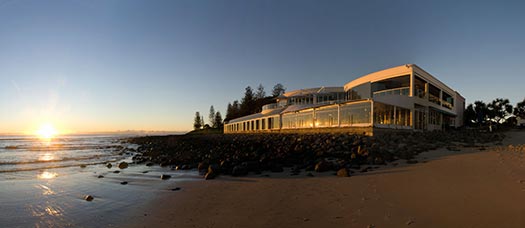 If you don't believe that the humble Elements can do a better job than CS3 - take a look at the same files aligned and blended in the premium software package. It's chosen good exposures for the sunrise and the right side of the building, but has chosen to include darker sections of the component images for the sky over the building and the building itself. When I completed this project in CS3 I had to montage the two sets of panoramas manually to overcome this problem. 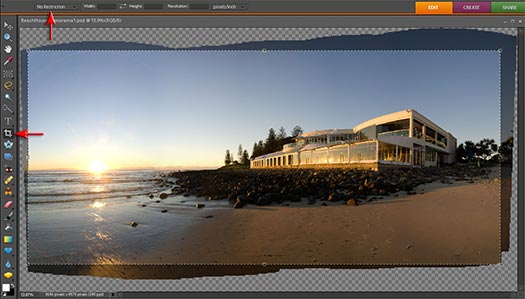 STEP 6 If you crop away the transparency before flattening the file, be sure to select the 'No Restriction' option in the Options bar and leave the width and height fields blank to ensure you don't encounter those cracks we discussed in the previous step.  STEP 7 I have sharpened the image and applied a linear gradient to darken the sky. It is important to note that the view of this particular building could not be captured any other way to achieve the same result. If I had moved back to encompass the entire view and then cropped down I would be left with less than 5 Megapixels of data and the skyline above the building would be very busy as the buildings behind this beach house would then come into view. The dramatic sense of perspective would also be lost the further I moved away from the building. Performance Tip Photomerge also has a 'Group Shot' option. This allows you to merge the best aspects of several images into the same image - especially useful when someone in a group has blinked or looked away. In this group shot below (if you can call one boy and his dog a group) it has been decided to combine two images (captured hand-held) so both the boy and his dog are looking at the camera. 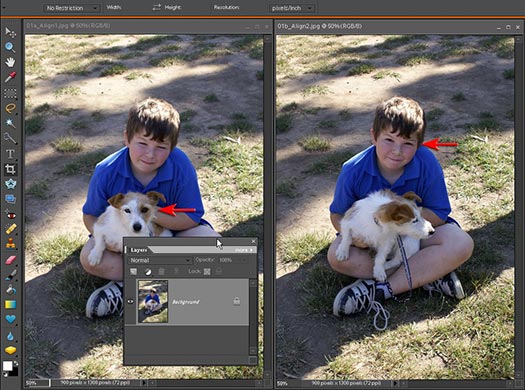 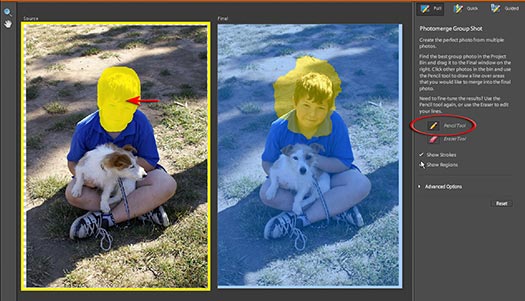 In the Group Shot dialog box you just scribble over the part of the 'source' image you would like to merge with the 'final' image. Although Photomerge will align and blend the component images with the same skill as the Panorama option, the user will be presented with an additional flattened file when Group Shot has finished weaving its magic. 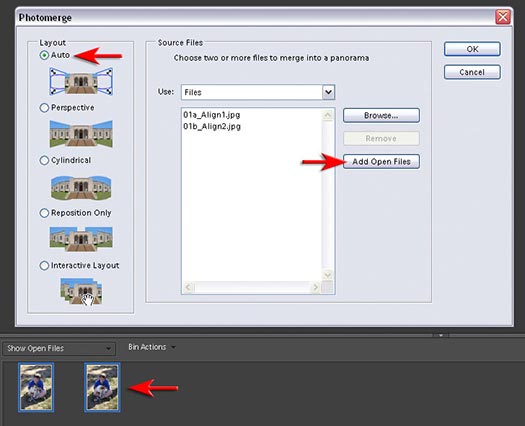 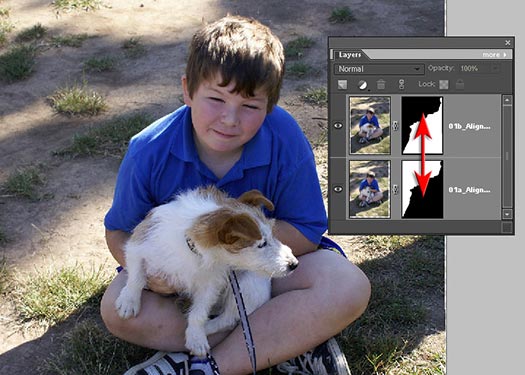 For those users who are still amazed at the results that can be achieved using Photomerge, but who mourn the loss of layers when using Group Shot, they can continue to use the Panorama option - even for group images. This is however only recommended for those photographers who use manual white balance rather than auto white balance in camera.
|
|
(#3)
|
|
||||
|
When the Panorama option has finished aligning the images it will have no idea as to the 'best bits' it should be including in the final result. In the image above it has decided that neither the boy nor the dog need to be looking at the camera. Notice how the layer masks, yes layer masks in Image layers in Elements, are concealing the best bits of each image. Fear not, for we can modify these layer masks so we do get the bits we want.
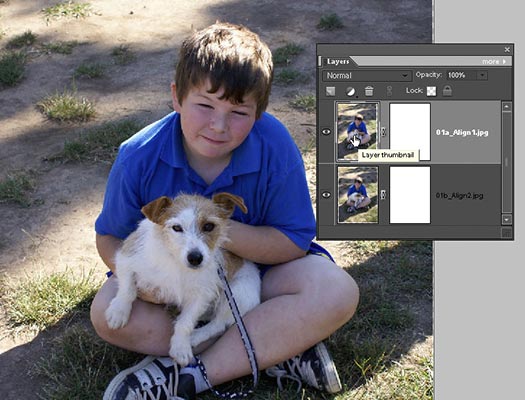 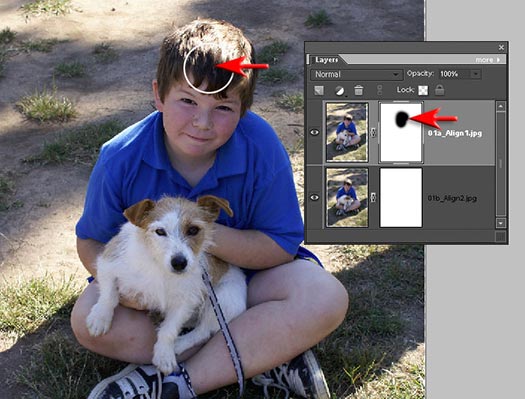 Clear both of the layer masks by clicking on each one in turn and then filling them with white. If white is the foreground color hold down the Alt key while pressing the Backspace key. Then choose the brush tool and paint with black into the mask to shield any of the pixels you do not want to see on this layer. This may seem like a novel approach to montage in Elements as we are now enjoying layer masks without having to hijack one on an adjustment layer. You will need to crop the image to finish your project. If you can see the value of this technique then you will quickly realize that taking multiple shots the next time you are presented with a group (or even just one man and his best friend) ensures the decisive moment is history (sorry Henri). There is a third automated feature in the Photomerge bag of tricks called Photomerge Faces. The results are often delightfully random, even though you are supposed to define the bits you want merged. 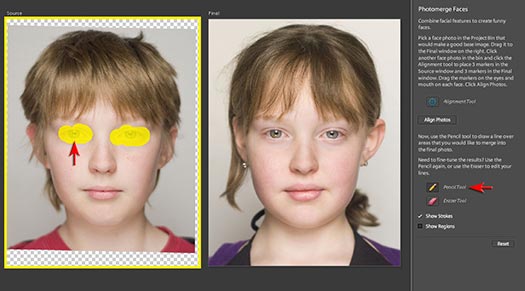 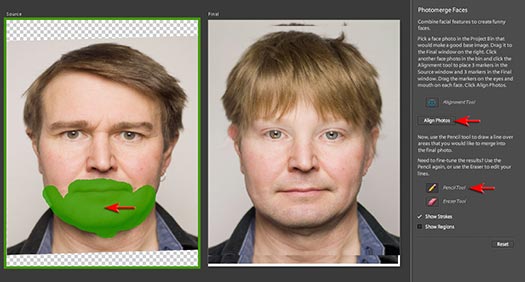 In the example above the boy's eyes have been merged seamlessly into the girl's face whilst in the lower of the two examples Photomerge has happily lifted the nose and lower portion of the ears in the source image in order to achieve a seamless stitch. Great fun (if slightly disturbing) - absolutely no commercial value - but will keep the kids amused for hours!
|
|
(#4)
|
|
||||
|
good sharing.
|
|
(#5)
|
|
||||
|
nyxxx sharing
|
|
(#6)
|
|
|||
|
nysse i allready know this 1  thx though
|
|
(#7)
|
|
|||
|
Thnx 4 sharin
|
|
(#8)
|
|
|||
|
niceee...
|
|
(#9)
|
|
|||
|
nice thx for shairing

|
|
(#10)
|
|
|||
|
Wooow its amazing i like it........... 
|
|
|
| Bookmarks |
| Tags |
| photomerge, tutorial |
|
|


 Linear Mode
